

LAYING THE FEEDING TUBE
-
Lay the feeding tube from the pressure reducer/tank to the plants.
-
The feeding tube is easier to lay when you heat it up (warm water, sun) prior to assembly. Do not kink the tube!
-
Cut the tube through and insert a T-piece (1) for every tube. Use an end-piece (2) at the end of the system.
-
Always push on the tubes completely (3).
-
The pre-assembled drip tubes in the set can also be left on the T-piece/end-piece for first-time assembly.
Info: The feeding tube is not suitable for direct laying in the soil or in walls. Use an empty conduit in this case; joints must remain accessible.
USE OF DISTRIBUTION DRIPPERS
With the Blumat distribution drippers, you can increase the number of drip points per Tropf-Blumat to up to 5. This achieves a more even water distribution is larger containers.
-
Cut off approx. 20 cm-long pieces from the thin drip tube and connect up to 5 distribution drippers with each other. Use an end distribution dripper at the end.
-
The first distribution dripper must be 8 cm away from the Tropf-Blumat. Position the other distribution drippers anywhere in the root area of the plants.
-
Now set the Tropf-Blumat as usual. Only then connect the distribution drippers with the Tropf-Blumat.
-
The black screw must not be adjusted. Unscrew completely and clean once a year or as required.


REQUIREMENT / PLANNING
-
Install at least one Tropf-Blumat per plant or pot.
-
1 Tropf-Blumat will water a radius of about 20-25 cm of soil.
Info: Watering takes place through the thin drip tube and not through the clay cone. The clay cone and the water in it serve only to control the watering.

WORTH KNOWING
Don’t be fooled by a seemingly dry surface. The water spreads out below the surface - usually only the surface of the soil under the drip tube is visibly moist. Too much water is also not good for your plants. It is a good idea to keep an eye on the appearance of your plant.
THE INNER VALUES COUNT
Maintenance and preparing for winter
Take the pressure reducer apart and store it in a frost-free location. You can leave all the tubes outdoors, however. Clean the Tropf-Blumat sensors in lukewarm water, removing encrusted soil from the clay cones with sandpaper.
It is best to use slow-release fertilisers that you add to the soil when planting. You can also add fertiliser using the watering can of course.
FERTILISERS
You can use Tropf-Blumat to water your vegetables without any hesitation. The synthetic materials used do not contain any plasticisers or any other worrying substances. Quality made in Austria.
Home-grown vegetables taste best
All around the house
Tropf-Blumat has been developed especially for outdoor plants. We recommend Blumat Classic and Blumat Easy for indoor plants.


TROPF-BLUMAT
INSTALLATION & POSITIONING
It’s easy to install a Tropf-Blumat system. You don’t need any prior knowledge or tools, household scissors suffice. Once installed, the supply lines remain in place and don’t need to be removed in winter either.
The positioning of the sensors is the same for all plants - you will quickly get the hang of it.

-
Unscrew the top parts and screw them back together underwater. Every Tropf-Blumat (sensor) must be filled completely with water.
-
Leave the sensors filled with water and screwed together in the water for at least 15 minutes.
-
This step is particularly important. Water the soil in all plant pots thoroughly several times before further assembly.
-
Stick a Tropf-Blumat into the moist soil next to every plant (approx. 10-15 cm away from the plant). The clay cone must be covered completely by soil, press down loose soil.
-
Connect the flexible drip tube to the T-piece or the end-piece and push it through the Tropf-Blumat. The end must protrude approx. 8 cm out of the Tropf-Blumat and should be near to the plant. Finally tighten the setting screws.
SETTING
-
Turn on the water tap and check that all the sensors are “closed”. There must be no drips coming from anywhere! If necessary, tighten the setting screw further.
-
Begin with the setting at the last Tropf-Blumat in the system so that the system is vented.

1. Turn open the setting screw in anticlockwise direction until water runs out of the drip tube.
2. Close the setting screw again slowly until no more water emerges. Just one drop of water should remain on the drip tube.
3. Finally close the setting screw another 1/4 turn (2 marking arrows).
Since the soil is moist, the Tropf-Blumat may not discharge any water. Watering does not begin until the soil is dry. Now make the setting for every single Tropf-Blumat.
READY!
-
Check the water discharge for several days after installation. Readjust, if necessary by turning open (= more water) or close (= less water). Adjust carefully, 1/2 an arrow will usually suffice.
-
Do not let a dry soil surface fool you. The water spreads out underground. In most cases, only the area under the drip tube is visibly moist.
Always leave the tap open/refill the water tank in time. Even in rainy weather. If the water supply is cut off for any length of time, the roots draw the water out of the Tropf-Blumat. A Tropf-Blumat that is not filled with water does not work!
CHECKS
Assembling the Tropf-Blumat sensors

WATER SUPPLY
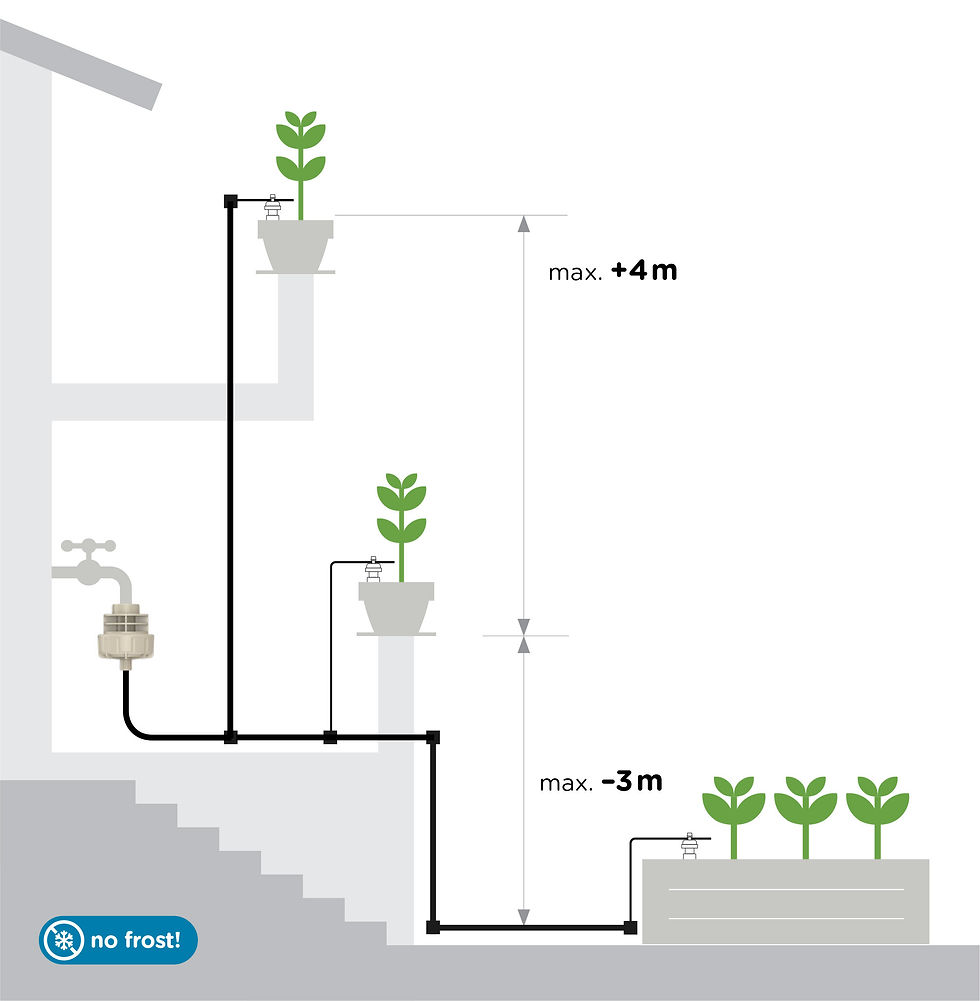
Option A: Pressure reducer
-
Connect the pressure reducer to a water tap or a pump with a compensation vessel.
-
The pressure is regulated constantly to 1 bar.
-
The plants may be standing up to 4 metres higher or 3 metres lower.
-
Up to 250 Tropf-Blumat sensors can be supplied by one pressure reducer.


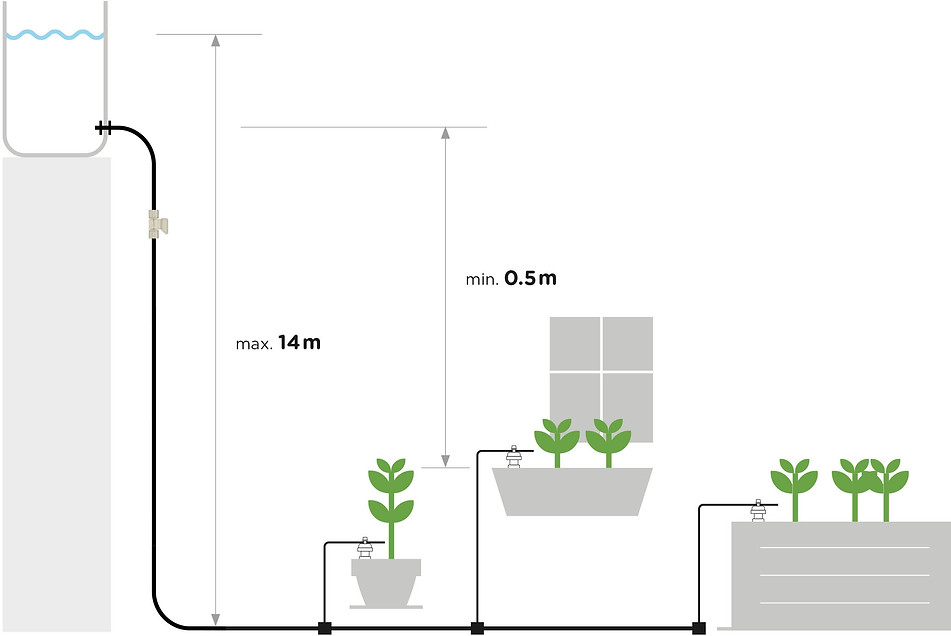
Option B: TANK CONNECTOR
-
Fit the tank connector to any container. To do this, drill a hole with a diameter of 12 mm.
-
The tank must always be higher than the plants (water level at least 0.5 m and max. 14 metres higher).
-
Fit the tank filter additionally, especially when using rain water.

Our recommendation: The water level should be at least 1 metre above the sensors.